
I still remember the frustration I felt looking in the mirror a few years ago. I was hitting the gym four days a week. I did endless barbell curls. Yet, my arms looked flat from the front.
It was a rainy Tuesday evening when I realized something was wrong. My wrists hurt constantly from the straight bar. My elbows felt stiff. Worst of all, my biceps were not growing the way I wanted.
I decided to watch the biggest guy in my gym. He was not near the dumbbell rack. He was at the cable station. He was doing rope curls with strict form.
I decided to try it. That day changed my arm training forever. I want to share exactly how I mastered rope curl form and how it helped me build wider, thicker arms.
Table of Contents
Why I Switched to the Cable Rope Curl
For years, I thought heavy barbells were the only way to grow. I was wrong. The straight bar forced my wrists into an unnatural position. This caused pain that limited my progress.
The rope attachment fixed this instantly. It allows a neutral grip. This means your palms face each other. It feels much more natural for the wrist joints.
I also noticed the tension was different. With dumbbells, the weight gets easy at the top and bottom. Gravity only pulls down. The cable machine pulls back and down.
This creates constant tension. My muscles have to work through the entire range of motion. There is no rest at the bottom. This constant strain is key for growth.
Here is a quick look at why I made the switch.
Comparison: My Experience with Bicep Exercises
| Feature | Barbell Curl | Dumbbell Curl | Rope Cable Curl |
|---|---|---|---|
| Wrist Comfort | Low (Painful) | Medium | High (Natural) |
| Tension Profile | varies | Varies | Constant |
| Muscle Focus | Short Head | Overall Bicep | Brachialis (Width) |
| Ego Lifting Risk | High | Medium | Low |
Setting Up for Success
I used to rush my setup. I would just grab the rope and pull. That was a mistake. Proper rope curl form starts before you even touch the weight.
First, I walk to the cable tower. I slide the pulley all the way to the bottom. I make sure the pin clicks in securely. I have seen pins slip out, and it is scary.
Next, I attach the rope. I check the rope for wear and tear. I prefer a longer rope if the gym has one. It allows for a better squeeze at the top.
I select a weight that is moderate. This is not a powerlifting move. I usually pick a weight I can lift for 12 to 15 reps. If I go too heavy, my form falls apart.

Finding the Perfect Stance
My stance acts as my anchor. I stand about one foot away from the machine. If I stand too far back, the angle gets weird. It turns into a shoulder row.
I place my feet shoulder-width apart. This gives me a solid base. I keep a slight bend in my knees. Locked knees can cause lower back strain.
I engage my core muscles. Imagine someone is about to punch you in the stomach. That is how tight your abs should be. This protects the spine.
Finally, I retract my shoulder blades. I pull them back and down. This keeps my chest up. It prevents my shoulders from rolling forward during the lift.
The Grip: Where Magic Happens
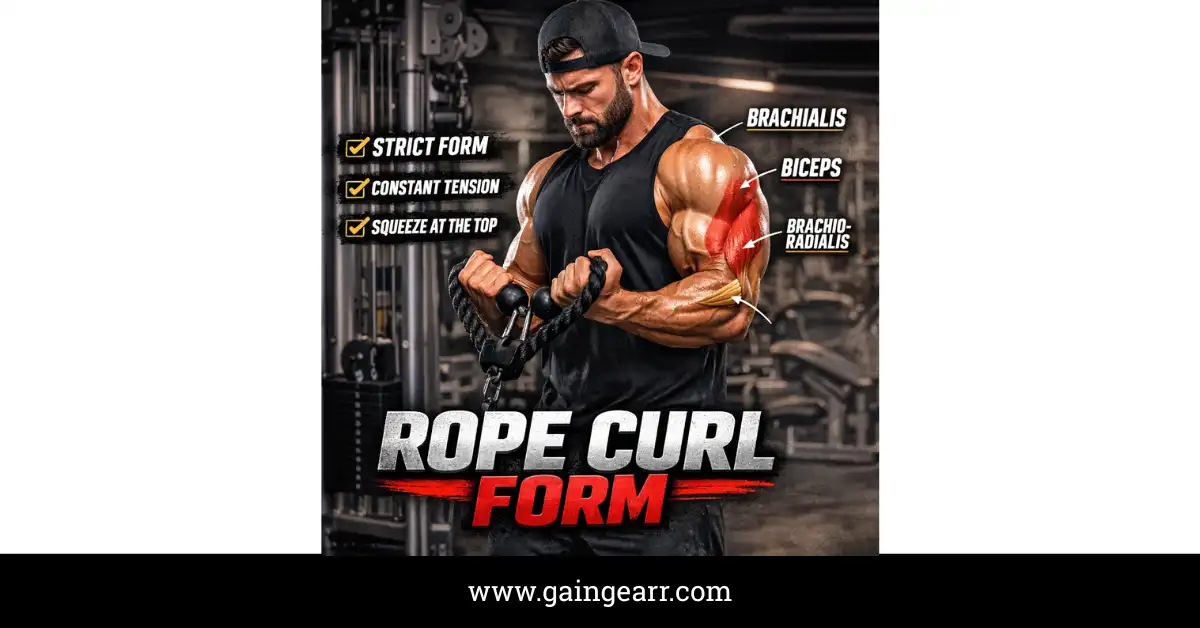
The grip on the rope is unique. I hold the rope with a neutral grip. My thumbs face the ceiling. My palms face each other.
I grip the rope right near the rubber stoppers. I do not choke up on the rope. Holding it at the end gives me more leverage.
I make sure my grip is firm but not deathly tight. Squeezing too hard wears out my forearms too fast. I want my biceps to do the work, not just my hands.
Executing the Movement
This is the part that took me months to perfect. The movement seems simple, but the details matter. Good rope curl form is all about elbow placement.
I pin my elbows to my sides. Imagine there is a bolt going through your ribs and elbows. They should not move forward. They should not move backward.
I take a deep breath in. I brace my abs. Then, I start the curl. I pull the weight up towards my shoulders.
The Twist at the Top
This is my secret weapon. As I curl up, I do not just lift straight. As my hands pass my chest, I pull the rope handles apart.
I try to make my hands wider than my elbows. This spreading motion hits the muscle hard. It targets the brachialis muscle deep in the upper arm.
I squeeze my biceps hard at the top. I hold this squeeze for a full second. I count “one-one-thousand” in my head. This peak contraction is vital.
The Eccentric Phase: Lowering the Weight
I used to drop the weight quickly. I let gravity do the work. I missed out on half the gains by doing that. The way down is just as important as the way up.
Now, I lower the weight slowly. I take about three seconds to return to the start. I fight the cable tension the whole way down.
I let my arms fully extend at the bottom. I feel a deep stretch in my biceps. I do not let the weight stack crash. I keep tension on the cable.
If the plates slam, I know I went too fast. I reset and go again. Control is the name of the game here.
Common Mistakes I Struggled With
I made plenty of errors when I started. My ego got in the way. I wanted to lift the whole stack. Here are the traps I fell into and how I fixed them.
The Hip Swing
I see this every day. I used to do it too. I would lean back and swing my hips to get the weight moving. This uses momentum, not muscle.
It looks silly and hurts your back. If I have to swing, the weight is too heavy. I drop the weight by ten pounds. I keep my torso rigid.
The Elbow Drift
This was my hardest habit to break. As I curled up, my elbows would drift forward. This brings the front deltoids into play. My shoulders were stealing the work from my arms.
To fix this, I stood with my back against a wall. I practiced keeping my elbows touching the wall. It humbled me. I had to use much less weight. But the burn in my biceps was insane.
The Wrist Curl
I used to curl my wrists in at the top. I thought it helped squeeze the muscle. It actually just puts stress on the forearm joints.
I learned to keep my wrists neutral. They should stay in line with the forearm. Think of your hand as a hook. The wrist should not bend.
Mistake Checklist
| The Error | What It Looks Like | How I Fixed It |
|---|---|---|
| Elbow Drift | Elbows move forward | Pinned elbows to ribs |
| Hip Swing | Leaning back | Lowered the weight |
| Short Reps | Not going all the way down | Fully straightened arms |
| Fast Reps | Dropping the weight | Counted to 3 on the way down |
Muscles Worked: Why My Arms Look Wider
The rope curl is special because of the muscles it targets. Standard curls hit the biceps brachii. That is the peak of the arm.
The rope curl hits the brachialis. This is a muscle that sits under the bicep. When it grows, it pushes the bicep up. This makes the arm look taller.
It also pushes the muscle out to the side. This gives the arm that thick look from the front view. This was exactly what I was missing.
It also works the brachioradialis. This is the large muscle on the top of the forearm. My forearms have grown significantly since I started these.
Incorporating This into My Routine
I do not start my workout with rope curls. I use them as a finisher. I usually do them at the very end of my arm day or pull day.
My muscles are already warm. I am not trying to hit a personal record. I am trying to pump as much blood into the muscle as possible.
I usually do 3 to 4 sets. I aim for 12 to 15 reps. Sometimes I go as high as 20 reps. I rest for about 60 seconds between sets.
My “Burnout” Set
Sometimes, on my last set, I do a drop set. I do as many reps as I can with my working weight. Then I move the pin up one slot to a lighter weight.
I immediately do as many reps as I can again. I do this two or three times. My arms feel like they are on fire. The pump is incredible.
Troubleshooting Pain
I had some elbow pain early on. I realized I was gripping too hard. I relaxed my hands slightly. The pain went away.
I also felt some shoulder pain once. I realized I was shrugging my shoulders up near my ears. I focused on keeping my shoulders down. The problem was solved.
If you feel sharp pain, stop. Check your form. Lower the weight. Do not push through bad pain. Muscle burn is good. Joint pain is bad.
Equipment Variations
Not all ropes are the same. Most gyms have short ropes. These are okay, but they limit how wide you can spread your hands.
I bought my own long rope attachment. It fits in my gym bag. It allows me to pull my hands way past my body.
This extra range of motion creates a huge contraction. If your gym only has short ropes, you can try using two ropes on one clip. It looks funny, but it works wonders.
The Mental Connection
Building muscle is mental too. I focus hard on the muscle I am working. I visualize the fibers contracting.
I close my eyes during the set sometimes. I block out the gym noise. It is just me and the cable. This mind-muscle connection makes a difference.
I do not count the reps until it starts to hurt. The reps that burn are the ones that count. That is when the growth happens.
My Results After Six Months
I stuck to this strict rope curl form for six months. I did not skip a week. I measured my arms before and after.
I gained almost half an inch on my arms. That sounds small, but on an arm, it is huge. My t-shirts fit tighter in the sleeves.
More importantly, my arms look better from the front. They look thick and dense. The separation between my bicep and tricep is deeper.
My wrist pain also disappeared. I can train arms pain-free now. This allows me to train harder and more often.
Final Thoughts for You
If you are stuck with your arm growth, try this. Stop worrying about how much weight you lift. Start worrying about how you lift it.
Master the form first. Leave your ego at the door. Use the rope to save your wrists and target the side of your arm.
It takes patience. It takes focus. But the results are worth it. Next time you are in the gym, grab the rope. Pin those elbows. Squeeze at the top. You will feel the difference immediately.
FAQ: Rope Curl Form
Why is the rope attachment better for curls?
The rope attachment allows a neutral grip, which reduces wrist strain significantly. This grip targets the outer arm muscle more effectively than a straight bar. It helps build thicker arms comfortably.
What if the cable machine rope is too short?
Short ropes limit how wide you can spread your hands. Try clipping two ropes to the cable pulley for a better range. You can also buy a long rope to keep in your gym bag.
How high should I set the pulley?
Set the pulley to the lowest notch on the machine rail. This low angle keeps the cable tension high from the start. It creates the best path for a strict rope curl.
Why does the weight stack slam when I lower it?
Slams happen if you lower the cable too fast. Release the weight slowly to protect the machine and your joints. Controlled movement keeps the tension on your biceps, not the stack.
Can I use a metal handle instead of a rope?
Metal handles often force a fixed grip that can hurt wrists. The flexible rope tool lets your wrists move naturally. This freedom prevents pain and isolates the brachialis muscle best.